How To Start Shopify Dropshipping Store in 2026 (A Complete Beginners Guide)
2/10/2026
So you've been thinking about starting an online business, and dropshipping keeps popping up everywhere you look.
Maybe you've seen the success stories, or perhaps you're just tired of the 9-to-5 grind and want something that gives you more freedom and flexibility in your life.
I get it—I've been exactly where you are right now, staring at my computer screen wondering if this whole dropshipping thing is actually legit or just another internet pipe dream that sounds too good to be true.
Here's what I've learned after diving deep into the dropshipping world: it's absolutely real, and yes, you can build a profitable business doing it, but it's not some magical overnight success button that influencers sometimes make it out to be.
What it IS, though, is a legitimate business model that lets you start selling products online without having to invest thousands of dollars in inventory upfront, rent expensive warehouse space, or deal with the nightmare of shipping and handling logistics yourself.
In this comprehensive guide, I'm going to walk you through everything you need to know about starting your own Shopify dropshipping store from absolute scratch, even if you've never sold a single thing online before in your entire life.
What Exactly Is Shopify Dropshipping?
In the traditional retail model, you'd have to buy products in bulk from manufacturers or wholesalers, store them somewhere (usually paying for warehouse space), and then pack and ship each order yourself whenever a customer makes a purchase.
That requires a ton of upfront capital, physical space, and time—not exactly ideal if you're just starting out or working a full-time job on the side.
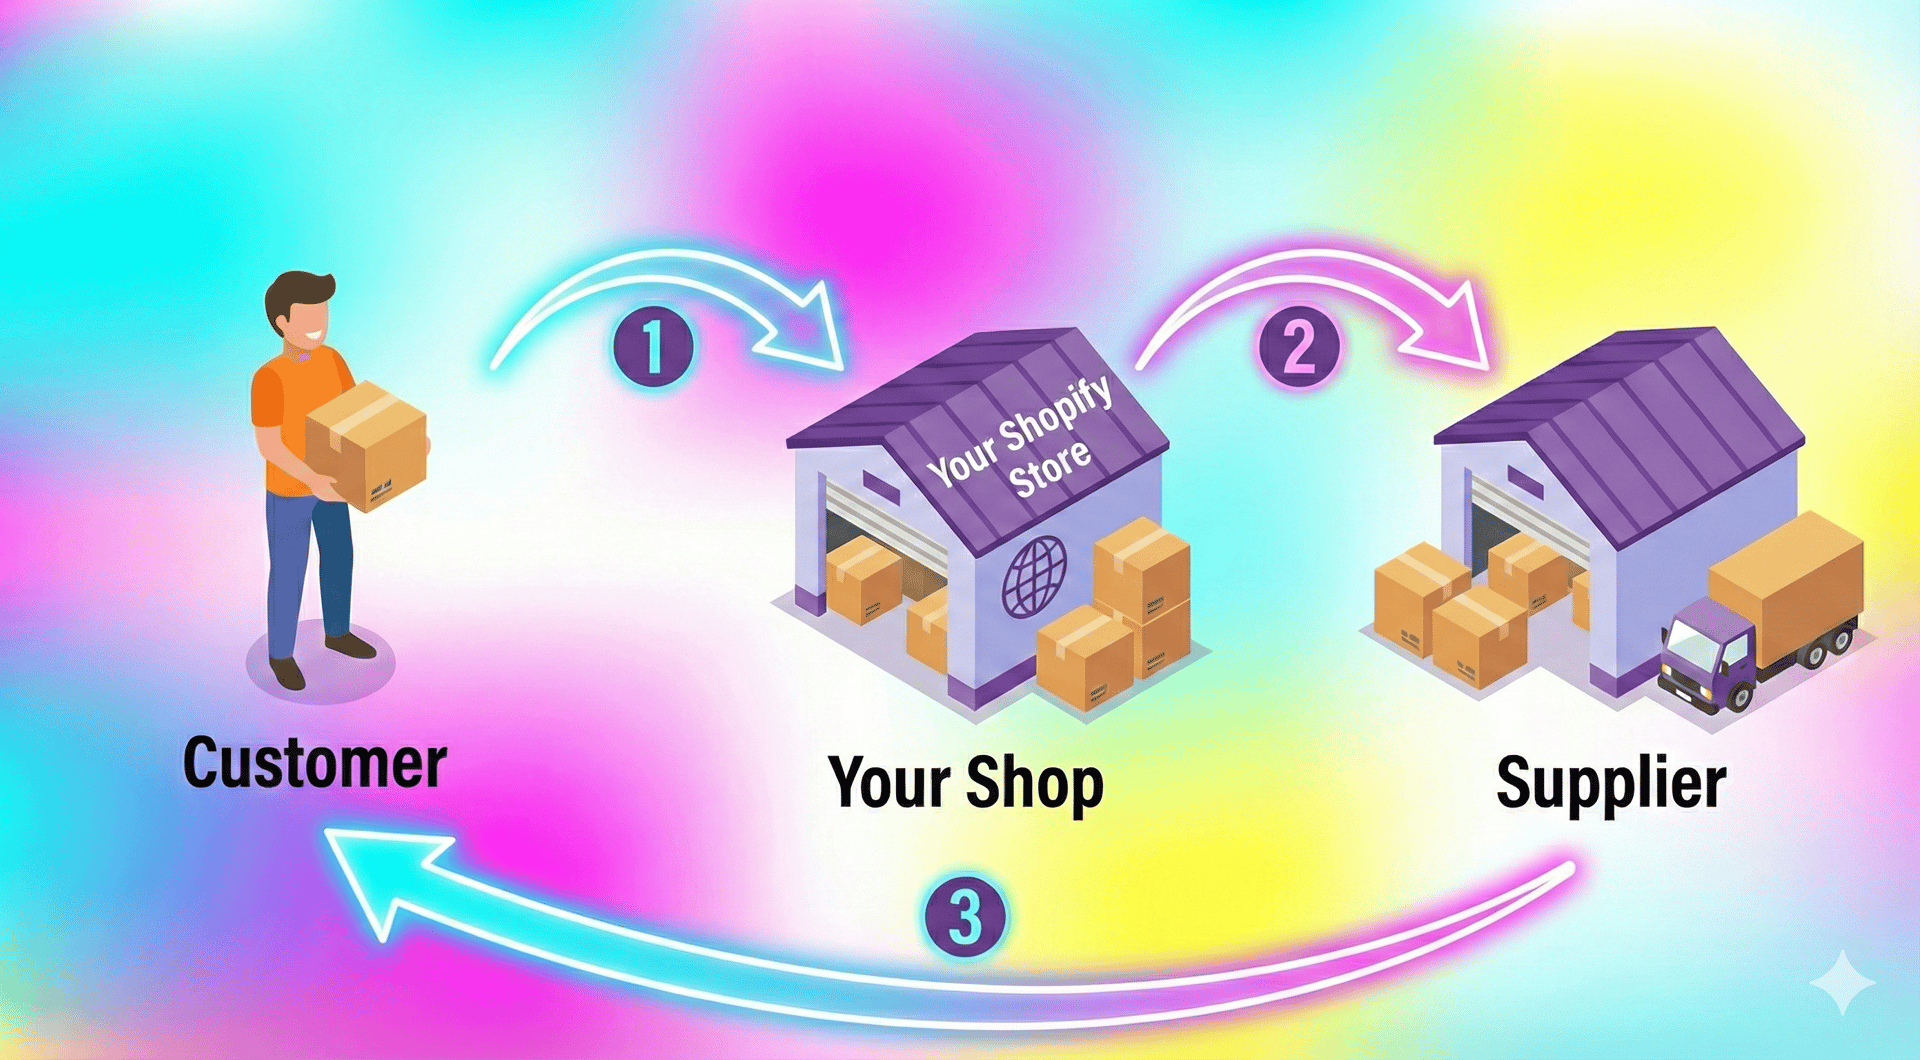
Dropshipping completely flips this model on its head in the best possible way. Here's how it works: You set up an online store using Shopify and list products that your supplier has in their inventory.
When a customer buys something from your store, you simply forward that order to your supplier, who then ships the product directly to your customer's doorstep—you never actually touch or see the product yourself.
Your profit is the difference between what your customer pays you and what you pay your supplier, and that's essentially your markup or margin on each sale.
The beauty of this business model is that you're essentially acting as the middleman between suppliers and customers, providing value through marketing, customer service, and curating great products, without having to deal with the headaches of inventory management or fulfillment.
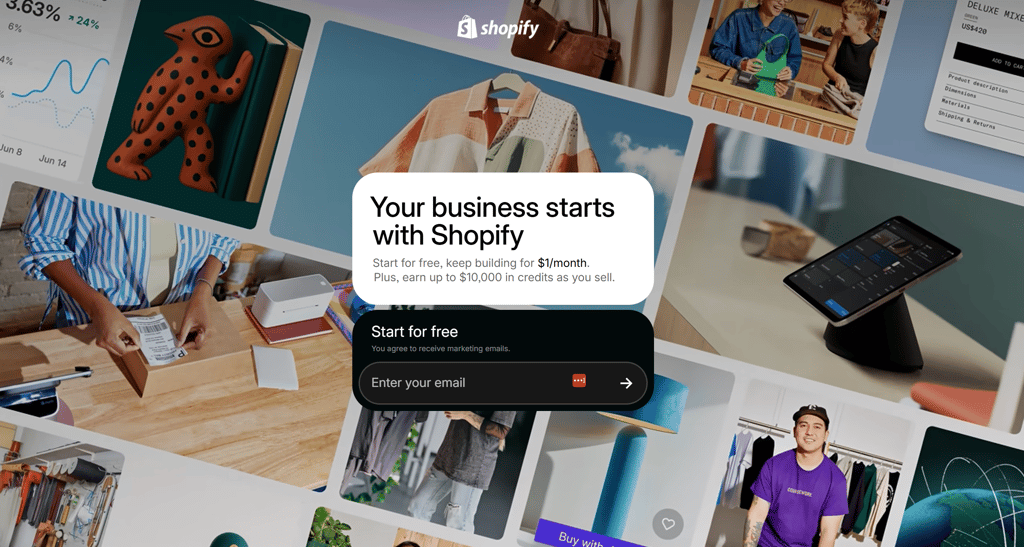
Step 1: Sign Up for Shopify
The first step is straightforward. Open Shopify page and sign up.
Shopify currently offers a 3-day free trial and then 3 months for just $1 per month, which makes it a very low-risk way to start.
You don’t need to commit long-term right away.
Go to the Shopify website, enter your email address, create a password, and follow the setup prompts.
During the initial setup, Shopify will ask a few questions about your experience and your goals. You can answer them honestly or skip if you prefer.
Eventually, you’ll be asked to name your store.
Don’t overthink this part as nobody won't see this
Choose something simple and relevant to the niche you want to sell in. It doesn’t have to be perfect. You can adjust your branding later if needed.
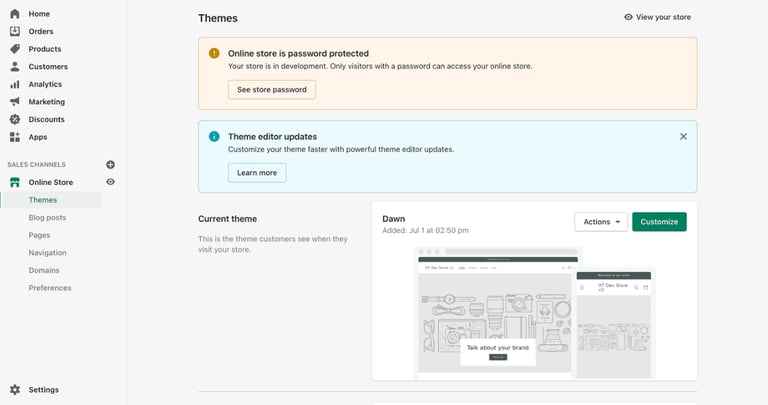
Once completed, you’ll land on your Shopify dashboard.
This is where everything begins.
Step 2: Choose What You Want to Sell
This is often the part where people get stuck. They think they need the perfect product before starting. In reality, you need clarity more than perfection.
Start by thinking about categories rather than specific items. For example, you might focus on home organization, pet accessories, fitness gear, kitchen tools, or beauty products.
The key is choosing a niche that has consistent demand and room for improvement. Avoid overly saturated “trendy” products that disappear in a few weeks.
In 2026, successful dropshipping stores tend to focus on solving small everyday problems rather than chasing viral trends.
Take a few minutes to decide your direction. Once you have that, the rest becomes easier.
Step 3: Do A Market Research - (Don't miss this step)
Before you start importing products into your Shopify store and filling it with random items that simply look interesting, it’s worth slowing down for a moment and being intentional about what you choose to sell.
This part might not feel exciting compared to designing your store or seeing products go live, but it quietly has the biggest impact on whether your store succeeds or struggles later on.
I learned this the hard way when I first started.
Back then, I thought product selection was mostly about creativity. I picked things that I personally liked or thought were clever, assuming other people would feel the same way.
So I added random gadgets, trendy accessories, and whatever looked “cool” at the time.
Everything looked fine on the surface. My store worked. The pages loaded. The checkout functioned perfectly.
But nothing sold. And after a while, it became obvious that the problem wasn’t Shopify or my setup.
It was the products themselves as nobody was actively looking for them.
That’s when I realized something important about dropshipping. It’s not about guessing what might work.
It’s about finding what is already working. Instead of asking yourself, “What should I sell?” it’s much safer and much easier to ask, “What are people already buying right now?”
That small shift takes a lot of pressure off your shoulders because you’re no longer trying to invent demand from scratch.
You’re simply following demand that already exists.
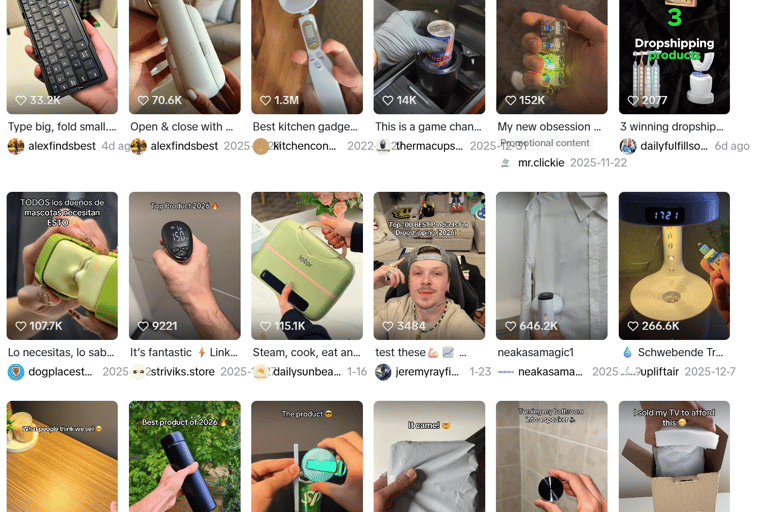
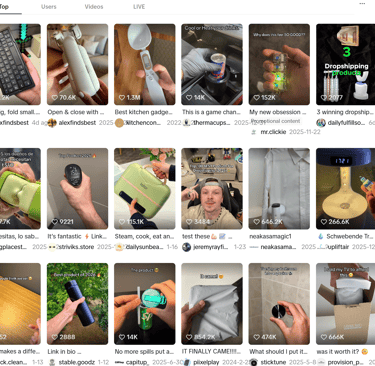
These days, many product trends actually start on TikTok.
If you spend even ten minutes scrolling your feed, you’ll probably notice certain items popping up again and again, demonstrated by different creators in slightly different ways.
It might be a small kitchen tool, a cleaning gadget, a beauty product, or something oddly satisfying that solves a simple everyday problem.
When you start seeing the same product repeatedly, that usually isn’t a coincidence.
In most cases, it means sellers are running ads because the product is converting and making sales.
That’s exactly the type of signal you want to pay attention to.
In the beginning, I used to manually scroll TikTok for hours trying to spot these trends myself, which worked, but it took a lot of time and felt inconsistent.
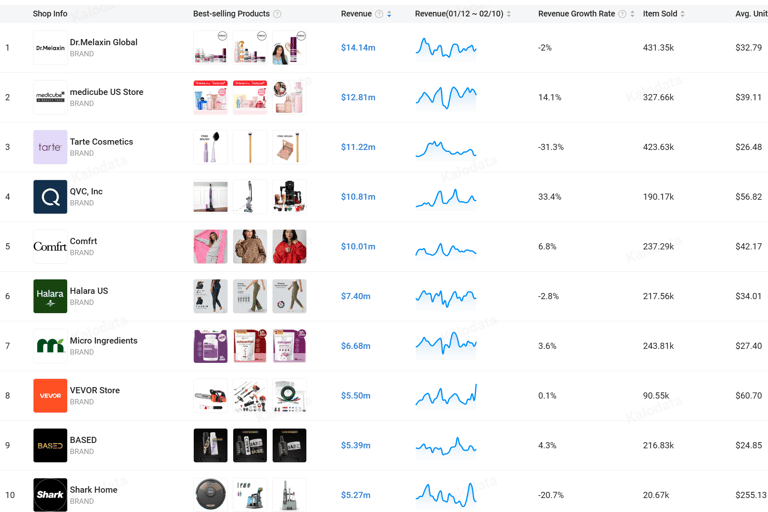
Eventually, I started using a research tool called Kalodata, and it honestly made the entire process much simpler.
Instead of guessing or endlessly scrolling, Kalodata shows you which products are already trending on TikTok, along with real performance data like views, engagement, and momentum.
So rather than relying on intuition, you can actually see what’s gaining traction in real time.
The first time I used it, it felt like someone had organized all the chaos for me.
Within a few minutes, I could spot patterns, notice which categories kept appearing, and quickly shortlist products that clearly had demand behind them.
It removed a lot of the uncertainty.
And that confidence matters, especially when you’re just starting out.
Because it’s much easier to test a product when you already know other stores are selling it successfully.
Another thing that helped me think more clearly is realizing that you’re not locked into only selling on TikTok just because you discovered a product there.
A product that performs well on TikTok usually performs well on Facebook too, simply because it’s the same people with the same problems, just on a different platform.
If something grabs attention and solves a real need, it tends to work almost anywhere.
So you can use TikTok and tools like Kalodata to discover what’s trending, then test those same products on Facebook ads or other channels later on.
The goal here isn’t to chase every single trend or constantly switch products every week.
It’s simply to choose a few items that already show signs of demand and give yourself a better starting point.
When you build your store around products people already want, everything else becomes easier.
Your ads feel more natural. Your store feels more focused. And those first sales feel possible instead of random.
So take a little time here and do your research properly.
It’s one of those small steps that quietly saves you weeks of frustration later.
And once you’ve found a few solid products, you’re ready to import them into your store and move on to the next part of the setup.
Step 5: Add and Optimize Your First Product
After importing your first product, you’ll want to refine it inside Shopify.
Click into the product page and review everything carefully.
Make sure the product title is clear and easy to understand.
Rewrite the description in your own words. Focus on benefits rather than just features. Explain how the product improves the customer’s life.
Upload clean, high-quality images. If needed, you can use simple background removal tools to make photos look more professional.
Set your pricing thoughtfully. You need to leave room for product cost, shipping cost, transaction fees, and profit.
Don’t rush this step, but don’t overcomplicate it either.
Once you click “Save,” your product is officially live in your store.
That’s an important moment.
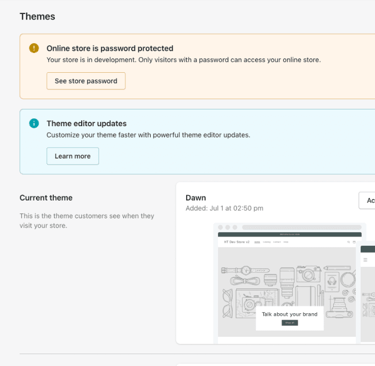
Step 6: Customize Your Store Design
Now that you have at least one product, it’s time to adjust the look of your store.
Shopify offers free themes that are clean and modern.
Go to the “Online Store” section in your dashboard and choose a theme - choose free theme Dawn or Refresh and you can upgrade to paid theme later.
After installing the theme, click “Customize.”
Here you can adjust colors, fonts, homepage layout, and product display sections.
Keep it simple.
Minimal designs often convert better than complex ones.
Make sure your homepage clearly explains what your store sells. Add a short headline and a brief introduction that builds trust.
You should also create essential pages such as About Us, Contact, Privacy Policy, and Terms of Service.
Shopify provides built-in generators for legal policies, which makes this process easier.
Step 7: Set Up Payments
To accept payments, go to your Shopify settings and navigate to the Payments section.
Shopify offers its own payment gateway called Shopify Payments, which works in many countries and is easy to activate.
You can also connect additional payment providers depending on your location.
Follow the setup instructions and provide the required business details.
Once connected, your store will be able to process credit card payments securely.
This step is important because it transforms your store from a simple website into a real business.
Step 8: Configure Shipping
Since you are dropshipping, your supplier handles shipping logistics.
However, you still need to configure shipping settings inside Shopify.
Go to the Shipping and Delivery section and define your shipping rates. Prices are usually $4.97 for US and $7.97 for the rest of the world.
Many dropshipping stores choose to offer free shipping and include the shipping cost within the product price.
This simplifies the checkout process and can improve conversions.
Make sure your shipping zones match the countries you plan to sell to.
Take a few minutes to review everything carefully.
Step 9: Connect a Custom Domain
By default, Shopify gives you a subdomain such as yourstore.myshopify.com.
For a more professional appearance, you may want to connect a custom domain like yourstore.com.
You can purchase a domain directly through Shopify or connect one you already own.
A custom domain helps build trust and makes your store look established.
This is a small detail that can make a noticeable difference.
Step 10: Place a Test Order
Before launching publicly, place a test order.
Shopify provides a test payment mode so you can simulate a purchase without real charges.
Go through the entire checkout process yourself.
Make sure confirmation emails are working.
Verify that the order appears correctly in your dashboard.
This final check builds confidence and ensures everything is functioning properly.
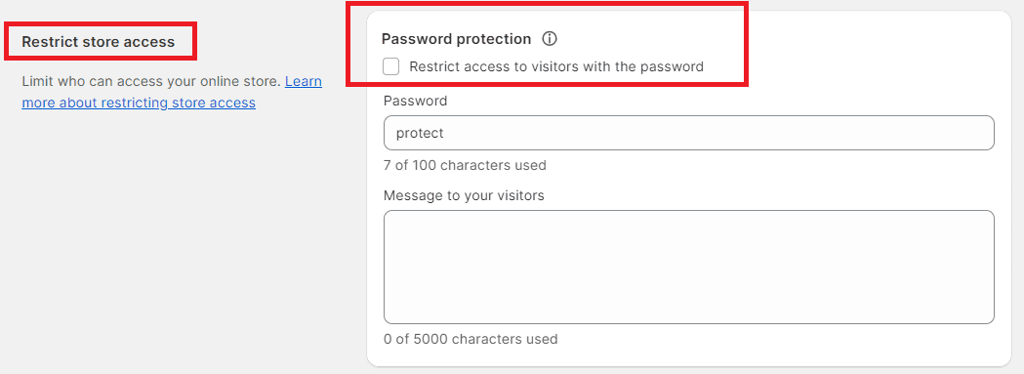
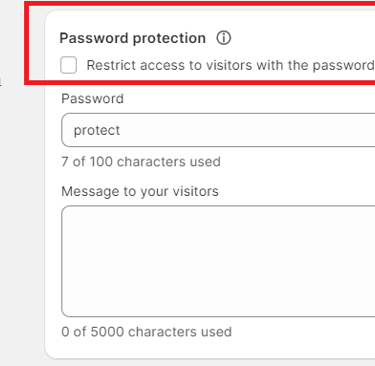
Step 11: Remove Password Protection and Launch
Once everything looks good, go to Online Store settings and remove password protection.
This makes your store publicly accessible. Take a moment to review your homepage, product pages, and navigation one last time.
If everything feels ready, your store is officially live.
That’s it. You’ve now started a Shopify dropshipping store.
What's Next?
Step 4: Choose the Right Supplier To Automate Orders
Once you’ve chosen a few products you want to sell, the next question naturally becomes simple.
Where do these products actually come from?
This is usually the part that confuses beginners the most.
People imagine warehouses, bulk orders, or boxes stacked in their living room.
But with dropshipping, none of that is necessary.
You’re not buying inventory upfront or storing anything yourself.
Instead, you connect your store directly to suppliers who already stock and ship the products for you.
When a customer places an order on your Shopify store, the supplier handles the packing and shipping behind the scenes.
Your job is simply to manage the store and bring in customers.
That’s what makes this model so beginner-friendly.
Still, doing this manually would quickly become messy.
Copying customer addresses, placing orders one by one, updating tracking numbers… it would turn into a full-time job.
Thankfully, you don’t have to do any of that.
If you’ve followed along this far, you’ve probably noticed something.
Starting a Shopify dropshipping store isn’t nearly as complicated as it sounds when you first hear about it.
Most of the fear comes from not knowing what the steps look like.
But once you break everything down and go through it one by one, it starts to feel surprisingly manageable.
You set up your Shopify store, which takes care of all the technical parts in the background. You connect a dropshipping app so products and orders flow automatically. You spend a little time researching what people are already buying instead of guessing. Then you polish your store, set up payments, and launch.
That’s really it.
There’s no coding. No warehouse. No complicated systems to build from scratch.
Everything connects together more smoothly than you expect.
Shopify handles the storefront, checkout, and payments. Your dropshipping app, whether it’s something like AutoDS or a similar tool, takes care of importing products and fulfilling orders behind the scenes. And for product ideas, platforms like Kalodata make it easier to spot what’s already trending so you’re not starting blind.
When you look at it this way, you’re not building a business alone.
You’re simply connecting a few tools that already exist and letting them do most of the heavy lifting for you.
That’s what makes dropshipping such a beginner-friendly way to get started.
Of course, your first store doesn’t have to be perfect.
No one’s is.
You’ll tweak things. You’ll test products and learn as you go.
But the important part is that you’re no longer stuck in the “research phase,” endlessly watching videos and reading guides without taking action.
At some point, the only thing left to do is open the dashboard and begin.
So if you haven’t yet, you can start with Shopify’s trial, spend an evening setting everything up, and just see it for yourself. Once you click around and watch your store come together, everything feels a lot less intimidating.
And who knows — a few weeks from now, you might be looking back at today wondering why you didn’t start sooner.
Take it one step at a time, stay patient, and keep things simple.
That’s usually all it takes.
Happy selling!

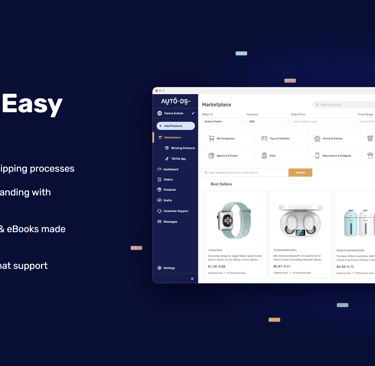
This is where automation tools come in.
AutoDS connect directly to your Shopify store and act as a bridge between you and your suppliers.
Instead of manually handling every order, the app automatically sends orders to the supplier, tracks shipments, and updates your customers with tracking information.
The first time I set this up, I remember thinking how surprisingly simple it felt.
After installing the app and linking it to my store, everything just synced together.
Products could be imported with a click, prices updated automatically, and when a test order came through, the system processed it without me touching anything.
It felt less like running a complicated business and more like setting up a system that quietly works in the background.
And that’s exactly what you want.
Because the goal isn’t to spend hours managing small tasks.
The goal is to free up your time so you can focus on things that actually grow your store, like improving product pages or testing marketing ideas.
Setting up AutoDS or a similar supplier app usually takes just a few minutes.
You install it from the Shopify App Store, connect your account, choose your suppliers, and you’re ready to start importing products directly into your store.
From that point forward, most of the fulfillment process becomes automatic.
Orders flow from your customer to your store, from your store to the supplier, and then straight to the customer’s doorstep.
You simply monitor everything from one dashboard.
Once this step is complete, something important happens mentally.
It stops feeling like you’re experimenting.
It starts feeling like a real system.
Because now, if someone buys, the order actually gets delivered without you scrambling to figure things out.
That confidence makes moving forward much easier.
So take a few minutes to connect your supplier app properly.
It’s one of those small setup steps that quietly saves you hours later.
And once it’s done, you can focus entirely on building and growing your store, knowing the logistics are already taken care of.
Why Shopify Is the Platform You Need
Let me break down exactly why Shopify has become the go-to choice for dropshippers worldwide, especially if you're just starting out and don't have extensive technical knowledge or coding experience.
Even if you've never built a website before, Shopify's interface is so straightforward that you can have a professional-looking store up and running within a few hours rather than days or weeks. The drag-and-drop editor makes customization simple, and you don't need to know a single line of code to create something that looks polished and legitimate.
What really sets Shopify apart is how seamlessly it integrates with dropshipping automation tools, particularly apps like AutoDS that handle everything from product imports to order fulfillment automatically. Your store will load quickly for customers, and Shopify handles all the technical backend stuff like hosting, security, and software updates so you can focus on actually growing your business instead of troubleshooting technical issues at 2 AM.
Whether you're making your first sale or your ten-thousandth, Shopify's infrastructure can handle the traffic and orders without breaking a sweat, and you can easily upgrade your plan as you expand. Plus, Shopify Payments lets you accept credit cards and other payment methods without needing to set up complicated third-party payment gateways.
Step-by-Step: Building Your Dropshipping Store
Step 12: Driving Traffic: Organic vs. Paid Strategies
Here's the harsh reality that many beginner dropshippers don't want to hear: you can have the most beautiful store with the best products in the world, but if nobody knows it exists, you won't make a single sale.
You need a solid traffic strategy, and there are two main approaches—organic and paid.
The Organic Route: Building an Audience Through Content
The organic approach involves creating valuable content on social media platforms to build an audience and drive free traffic to your store over time. This method requires more patience and consistent effort, but it can be incredibly powerful and cost-effective once you gain momentum.
TikTok has become an absolute goldmine for organic dropshipping traffic. The platform's algorithm is incredibly generous with reach, meaning even accounts with zero followers can go viral if the content resonates with viewers.
The key is creating entertaining, authentic videos that showcase your products in action without feeling overly salesy—think product demonstrations, unboxing videos, problem-solution content, and lifestyle content that naturally incorporates your products.
Instagram Reels and YouTube Shorts work similarly, giving you opportunities to reach massive audiences without spending money on ads. Post consistently (ideally daily), engage with your audience genuinely, and provide real value through your content rather than just constantly pushing sales.
Over time, as your content gains traction and you build a following, you'll have a steady stream of free traffic coming to your store.
The downside? Organic growth takes time—you might not see significant results for weeks or even months. But once you build an engaged audience, that traffic is essentially free and those followers are much more likely to trust your recommendations and make purchases.
The Organic Route: Building an Audience Through Content
If you want faster results and have some budget to invest in advertising, paid traffic can help you scale much more quickly, though it requires continuous testing and optimization.
TikTok Ads Manager has become one of the most effective platforms for dropshipping ads because the audience is highly engaged and the cost per click is often lower than traditional platforms.
The key to success with TikTok ads is creating content that doesn't look like ads—you want videos that blend seamlessly into users' feeds and feel authentic rather than polished and corporate. User-generated content style videos, influencer-style product reviews, and before-and-after demonstrations tend to perform exceptionally well.
Start with a modest budget of $20-30 per day while you're testing different creatives and audiences to see what resonates.
Meta Ads Manager (Facebook and Instagram ads) remains incredibly powerful for dropshipping despite increasing competition over the years. The platform allows you to target extremely specific audiences based on interests, behaviors, demographics, and even recent life events.
The real advantage of Meta's platform is the sophisticated targeting options and the ability to retarget people who visited your store but didn't purchase—this is where a lot of the profit actually comes from.
Start with a budget of $10-20 per day while you're learning the platform and testing different audiences and creatives. Run multiple ad variations simultaneously, kill the ones that aren't performing, and scale up the winners.
Most successful dropshippers use a combination of cold traffic campaigns (reaching new people) and retargeting campaigns (following up with people who already showed interest).
The hybrid approach often works best: use organic content to build an audience and establish credibility, then use paid ads to scale quickly once you've validated your products and refined your messaging. Many successful dropshippers create content organically on TikTok and Instagram, then boost their best-performing posts with ad spend to maximize their reach.
What We’re All About
We help beginners discover online business the simple way. Through step-by-step guides, practical tools, and easy-to-follow strategies, we break down the overwhelm and show you exactly what to do next. No jargon, no guesswork — just clear actions that move you forward.
Hot Topics
Tools & Resources
Pinterest Business
How to start Shopify Store
Copyright © 2026. All rights reserved.
Shopify Tools
Contact